What Is the Best Cheap Cut of Beef for Pot Roast

No matter how relatively inexpensive a chuck or round roast may appear, if it turns out so tough and flavorless it's passed to the dog, that purchase was no bargain. That's why everyone on a food budget needs to know how to roast cheaper cuts of beef.
Finally, thanks to very extensive research and experimentation by Christopher Kimball, as reported in Cooks Illustrated magazine*, we can confidently purchase those cheaper cuts and expect perfect results every time.

These days, with beef prices hitting all-time highs, buying the cheaper cuts of beef is one way to make our food dollars stretch as far as possible. Just know that what follows is for those of us with more time than money.
When looking for inexpensive cuts keep these three words in mind: chuck, sirloin, and round. The chuck is fattier and more tender, the round is lean and relatively tough. The sirloin falls somewhere between the two.
It was a kick to read all the endless details of Chef Kimball's testing. To be quite honest he lost me somewhere between five chuck roasts, seven sirloins, eight rounds, and the endless descriptions of cooking methods, internal temperatures, standing times, and length of aging.
Curious as I am, I don't care about meat fibers, enzymes, and moisture content. And t hat's when I raced to the conclusion and learned exactly how to prepare a cheap cut of beef. And here it is:
Equipment
To achieve the best results you'll need:
- rimmed baking sheet with a wire rack
- meat thermometer (not instant-read but this kind that stays in place in the roast while cooking)
- oven thermometer (that measures the exact internal temperature of the oven itself)
- cooking twine or string
Ingredients
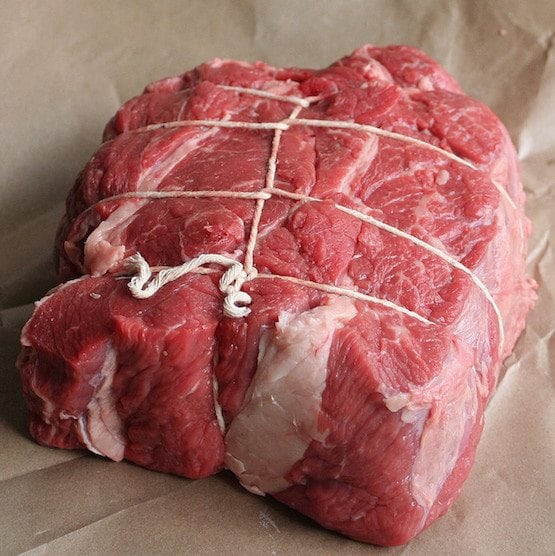
- 1 boneless beefchuck, sirloin, or round roast (3 to 4.5 lbs)
- 4 teaspoons kosher salt, or 2 teaspoons table salt, more or less depending on size of roast
- 2 teaspoons plus 2 tablespoons vegetable oil (divided)
- 2 teaspoons ground black pepper
Exact temperatures are the secret to the best results. Interestingly, varying the oven temperature, internal temperature, and times even slightly produced, for Kimball, roasts that were all the way from slightly dry to so tough they could not be eaten! Exact temperatures, capiche?!
The Steps
The following steps are for chuck, sirloin, and round cuts of varying size although 2- to 5-pound roasts are ideal and will produce the best results.
This process is tedious and you'll need to start the day before you plan to serve. Just know that for the money you'll save and the result you will achieve, it's so worth it!

- Tie the roast with white cotton string at 1-1/2 inch intervals. Tying the roast tightly makes it compact and shaped evenly and that's the secret to even roasting.
- Pat roast dry with paper towels; rub with 2 teaspoons oil and generously sprinkle all sides evenly with salt and pepper.
- Wrap tightly with plastic wrap and refrigerate for at least 24 hours.
- Move an oven rack to the middle position. Set oven temp to 250 F.
- Heat remaining tablespoon of oil in a large skillet over medium-high heat until it begins to smoke.
- Remove plastic wrap and sear roast until well-browned on all sides, 3 to 4 minutes per side.
- Transfer roast to a wire rack set in a rimmed baking sheet.
- Place the meat thermometer in the roast so the tip reaches the center of the thickest part. Set sheet, rack and roast in oven on its middle rack
- Set the oven thermometer inside the oven close to the pan.
- Roast uncovered at exactly 250 F (keep your eye on it and adjust oven temperature dial as needed to achieve exactly 250 F—do not depend on the oven's built-in temperature setting) until the internal temperature of the roast reaches exactly 115 F for rare, 130 F for medium (approximately 2 to 2 1/4 hours for 3 to 4.5 lbs roast).
- Turn oven off but do not open the door! Leave roast in the oven until the thermometer inserted in the center of the roast registers 130 F for rare, 145 F for medium; it will continue to cook. (If the roast has not reached desired temperature, heat oven back to 250 degrees for five more minutes, turn it off.)
- Allow to sit for 30 minutes longer, still without opening the oven.
- Remove the pan from the oven and allow the meat to rest for 15 minutes. Transfer roast to a carving board. Slice and serve.
- Reserve any and all juices that have accumulated in the sheet pan to heat and serve with the meal.
At that moment, according to Kimball, the roast will be succulent, tender, juicy, and more flavorful than prepared using any other cooking method. My family and I agree!
*Note:
Christopher Kimball and Cook's Illustrated parted ways several years ago. Within days, Kimball founded a new publication, Christopher Kimball's Milk Street. Legal battles ensued. I'm sure there were arguments over who owned legal rights for all of the intellectual properties Kimball created while at Cook's Illustrated. All that to say, if you were to search Cook's Illustrated for Kimball's method I've referenced above, you'd find a very different version. I can only guess that Kimball retained rights to much that he created while at Cook's Illustrated, which prompted Cook's to replace it with something different.
More from Everyday Cheapskate
Please keep your comments positive, encouraging, helpful, brief,
and on-topic in keeping with EC Commenting Guidelines
morenofouldlairity.blogspot.com
Source: https://www.everydaycheapskate.com/roast-cheap-cut-beef/


0 Response to "What Is the Best Cheap Cut of Beef for Pot Roast"
Post a Comment